Have you ever saved an image to your computer and when you went to search for it later, you couldn’t find it? That’s probably because the image did not have a memorable file name. Using a descriptive image file name is just one step you can take to optimize your images for search engines. Read on to learn how to create SEO-friendly images for your website, or jump to the section you want to read!
- What is image SEO?
- How do users find my images?
- How to pick the right image
- How to create SEO-friendly images
What is image SEO?
Image search engine optimization (SEO) is the process of optimizing the images on your website to generate more organic traffic from image search engines like Google Images, Yahoo Image Search, and Bing Images. Websites often use images on their pages, but will completely overlook the optimization process. This can have drastic effects on a website’s ability to rank well in image search results.
In fact, did you know that images frequently account for most of the bytes on a web page that the browser has to download before the page can load? To put that in perspective, a 100x100px image is made up of 10,000 pixels, or 40,000 bytes (one pixel is equivalent to four bytes), or 39 KB. While this may not seem like a large image, larger images can significantly slow down a page. Images that have not been optimized for SEO typically have more bytes, which means a slower page load time and potential traffic losses. To avoid losses and boost your images’ performance in image search engines, always optimize your images for SEO.
How do users find my images?
Similar to the individual pages of your website, search engine robots also crawl and index the images on your website to rank them in image search results. So, how do users find your images and get to your website? Let’s look at the following scenario:
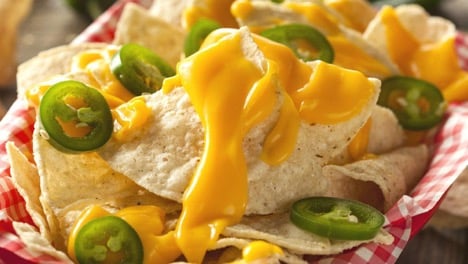
Betty is an active food blogger and she just posted a recipe for ballpark nachos on her website. Her recipe includes several high-quality (and SEO-optimized) photos of her homemade nachos. Search engine robots will crawl Betty’s blog post and index her images in image search results. The search engine robots will use the image’s file name (homemade-ballpark-nachos-1.jpg), its alt text (Ballpark Nachos with Cheese), and the surrounding text on the page to understand the image’s context in order to apply it to relevant image search queries.
When a user searches for a query related to Betty’s ballpark nachos (ballpark nacho recipe), Betty’s image may appear in image search results. If a user clicks on Betty’s image, the image will link them to Betty’s homemade ballpark nachos recipe on her website. (Shout out to Betty’s Kitchen on YouTube for the inspiration—and homemade ballpark nachos recipe!)
The goal of image optimization is to minimize a web page’s load time without sacrificing the quality of the image and its relevancy to the page’s content. When used to enhance user experience (UX), images can help users to better understand your web page.
How to Pick the Right Image
When selecting an image to supplement your web page’s content, there are a few factors to consider:
- Avoid using images just to use images
- Use original images over stock photos
- Use images that are relevant to your web page’s topic
- Position the image next to relevant text
- Place images you wish to rank for toward the top of the page
If you don’t have access to original photos, there are several websites like Unsplash and Pixabay that offer unique images for free.
How to Create SEO-Friendly Images
Creating SEO-friendly images is a controversial topic because there is no set-in-stone process for optimizing images. However, these 11 tips will give you a better idea of how to optimize your website’s images and implement a process for SEO image optimization.
1. Choose a Descriptive File Name
The first step to creating an SEO-friendly image starts with its file name. When you export or save images, the file name usually uses a default naming convention based on the image’s original source. For example, if you upload photos from your digital camera to your computer, the file name may look something like IMG_0123.jpg. Typically this file name does not describe the image, which means search engine robots will definitely not know what the image is about when they crawl your images. A few tips to keep in mind when creating your image file name:
- Use your web page’s target keywords in the file name.
- Remove any unnecessary words (a, an, the, etc.).
- Always use hyphens ( - ) in file names with more than one word; do not use underscores ( _ ). Similar to how Google “reads” URLs, hyphens make it easier for Google to “read” your image file name.
Let’s take a look at another example using food blogger Betty’s ballpark nachos recipe:
Betty’s blog post uses several original images of her ballpark nachos. In order to help search engine robots understand her images, she uses descriptive file names like homemade-ballpark-nachos-1.jpg to describe the finished product and nacho-cheese-1.jpg to describe one of the ingredients.
It’s as easy as that! Take the time to give your images a short yet descriptive file name to help search engine robots gather context. If you have similar images, consider using the same naming convention. For example, homemade-ballpark-nachos-1.jpg, homemade-ballpark-nachos-2.jpg, and homemade-ballpark-nachos-3.jpg.
2. Choose an Appropriate Image Format
Once you’ve found the right image, it’s important to consider the image’s format, or file type. The three most common file types supported by all web browsers include GIF, JPEG, and PNG.
GIF: Use a GIF file type if you need animation.
JPEG: Use a JPEG file type if you have larger images.
PNG: Use a PNG file type if you need to preserve graphics with a transparent background.
Other image file types include SVG (for logos and icons) and WebP (an alternative to JPEG and PNG images).
After you’ve selected the appropriate format, it’s time to re-size your image!
3. Re-size the Image
Your web page’s loading time is extremely important for SEO, and large, unoptimized images can significantly impact how fast your page loads. If your page is slow to load for visitors, it can hurt your UX and your page’s ability to rank well in search results. To prevent images from hijacking your page’s loading time, properly size your images for how you would like them to display on your web page. You can do so by reducing the number of pixels in the image, which will help to decrease your image’s file size and, thus, your page’s loading time. Along with resizing your image, it’s also important to make the image responsive.
4. Make the Image Responsive
Serving responsive images means the image will fit to a user’s screen size (desktop, tablet, mobile). Responsive images also affect SEO because Google uses mobile-first indexing (Google’s search engine robots will only crawl and index the mobile version of a web page); if the image is not useful on mobile devices, then the page may not rank as well as it could in search results. To make your image responsive, apply the srcset attribute to the image. This HTML attribute specifies how the image should appear for different screen sizes.
5. Compress the Image
The next step is to compress your image to further reduce its file size. Image compression allows you to decrease your image’s file size without sacrificing its quality. There are several free image compression tools available. Here at Blue Frog, we recommend using ImageOptim. Try to reduce your image’s file size to 70 KB or less. For larger images or full-screen graphics, the image should not exceed 1,000 KB. Once you’ve re-sized and compressed your image for the web, plug your web page into a tool like Google PageSpeed Insights or GTmetrix to see how fast your page loads and how your image affects the page’s loading time. Both tools can help you identify further image optimizations too!
6. Add Captions
An image’s caption is the text that appears alongside the image. While you can use the caption to further describe the image, not every image warrants a caption. Only use an image caption when it will help to improve UX and your image’s SEO.
7. Add Alt Text
An image’s alt text (a.k.a. alt attribute, alt description, alt tag) is an HTML attribute that helps to describe the image for search engine robots. The alt text is also important for users because it will appear when a user hovers over the image, or if your image fails to load, the alt text will appear in the image’s place. Follow these tips for writing image alt text:
- Use alt text for every image
- Accurately describe the image for search engine robots and users
- Keep your alt text relatively short
- Include your target keyword or phrase
- Avoid keyword stuffing
After adding your alt text, you only have a few more steps until your image is fully optimized for search engines!
8. Add Structured Data
Have you ever seen rich results in Google Search? These rich results are possible with the help of structured data markup (schema). Google uses structured data to understand a web page’s content and create rich search results like Product or Recipe snippets.
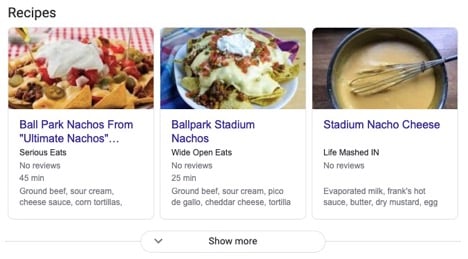 Adding Structured Data Can Enhance Your Image or Web Page’s Appearance in Search Results.
Adding structured data does not directly affect your rankings. However, it can indirectly affect your rankings because Google displays your web page as a more enhanced listing than the standard search result, which can improve your clickthrough rate. For images, Google provides a set of guidelines to follow when applying structured data.
Now that you’ve added the necessary structured data for rich results, add Open Graph tags to make your web pages visually appealing when shared on social media.
9. Add Open Graph Tags
You can add several Open Graph tags to a web page to define how content is shared on sites like Facebook. For images, use the following Open Graph protocol in the <head> section of your page’s HTML:
<meta property=”og:image” content =”https://www.example.com/image.jpg” />
This tag signals to social sites how your image needs to appear when a user shares your web page. For example, the image below features a ballpark nacho recipe shared to Facebook.

If you don’t specify an image Open Graph tag, social sites will scrape something together from your page, which means it might not look good when shared on social media.
10. Use an XML Image Sitemap
An XML sitemap is essentially a map of your website that tells Google which pages hold the most importance and how the internal pages link to one another. Your XML sitemap helps Google find the most important pages of your website. The same goes for your images. If you want Google to crawl and index specific images on your website to rank in Image Search results, then you should consider using Google image extensions for sitemaps.
11. Track Your Optimizations
Now that you’ve made all of these image optimizations, it’s important to track your efforts so you can report on successes and make further improvements in the future. A great (and free) tool to track your images’ performance is Google Search Console (GSC). Track your image results in GSC by following these steps:
- Navigate to Search results under Performance in the left-hand menu.
- Next, select the edit icon for the button Search type.
- Finally, select the Search type Image to filter the performance report for images.
After you make any image optimizations, frequently monitor your images’ performance in GSC to identify successes and areas for improvement.
Creating SEO-friendly images is not an easy task, but implementing a consistent strategy for optimizing your images can pay off significantly in the long run! Remember, this post is part of a larger series, so stay tuned for the next post in the series: Tips to Optimize Your Navigation Menu.
To learn even more about Local SEO, download the Local SEO Checklist.